

Customize Email Message
Our professionally designed templates are a good start, but now it’s time to get your message across. If you want participants to open your email, your message should be very clear: this is an important invitation!
Navigate to
- Start with a Template
- Customize Inbox Information
- Header
- Include Logo
- Language
- Footer
- Colors and Fonts
- Embed a Question
- Mail Merge
- Finalize and Save
Review the steps below for a closer look at the options for customizing your invitations.
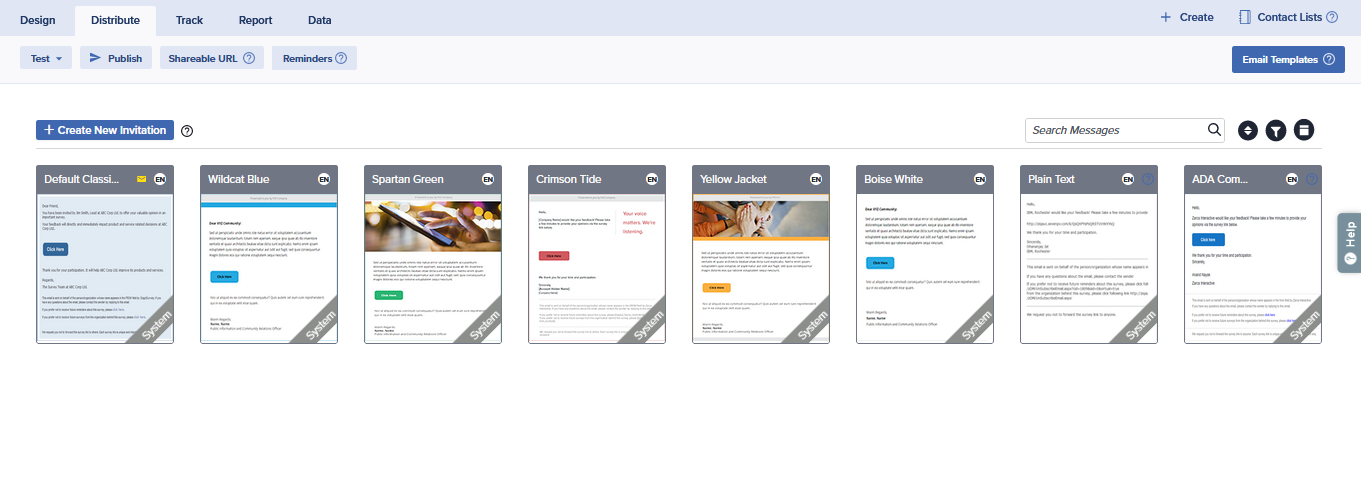
Start with a Template
- Under Distribute, click on Email Templates.
- Click on the blue Create New Message button in the top left.
- Select a baseline message.
Customize Inbox Information
- Sender Name: Enter the sender’s name. By default, this value will be the name on the account.
- Sender Email: By default, the Sender Email will use Sogolytics mail servers. We recommend you use this default address, as editing this field may cause delivery issues or classification as spam. Any modifications made to the sender email address will trigger a DMARC Policy check. If the DMARC Policy for the sender email address domain is set for Quarantine or Reject, you will not be allowed to send invitations using that template unless you:
- Reset to the default sender email address
- Authenticate Email Domain
- Use Your Mail Server
OR
OR
- Reply-to Email: By default, this will be your account email address, but it can be edited to your preferred address for this project.
- Subject: Enter the subject to describe your project. Content should be short and simple. The maximum character limit for this field is 250.

Header
Include BCC
The BCC (Blind Carbon Copy) field is used to deliver an email invitation to a hidden recipient without the knowledge of any other recipients. Anyone who receives an invitation can see the address in the ‘To’ field, but only the sender will know if someone has been BCC’d.
In general, BCC is used to protect recipients’ privacy. When sending invitations, the BCC field is most commonly filled with the address of a survey or project administrator who wants to confirm delivery and/or create a duplicate invitation.

Two options are available:
- Copy on one invitation: Selecting this option sends a copy of one single invitation to the email address in the BCC field.
- Copy on all invitations: Selecting this option sends copies of all invitations to the email address in the BCC field.
If you BCC yourself on an email invitation and access the participation link received in the copy, the email status will be updated accordingly within Track.
Include Logo
- To add a logo to your email invitation, click on Yes.
- From the dropdown, choose your source to browse and upload the image.
- You will see the update in the header section of your email.
Maximum logo file size is 5 MB.
Maximum logo file size is 5 MB.
Language
Identify the invitation language. Once selected, participation links and other default text will be updated automatically.
Note: Invitation content must be manually entered in this language.
Footer

Within the Footer section, you may choose to include optional messages and features.
- Follow us on Social Media: This option allows you to share links to your social profiles with your subscribers or participants. Enable this option by switching the toggle to Yes and check the fields to add your social media addresses. Added social media links will appear to the right within the email footer as a ‘Follow us on’ section. Up to 6 social media accounts may be linked.
- Opt-out: This option allows recipients to avoid receiving reminders and/or to avoid receiving any future invitations. Enable this option, then modify the default text provided in the footer or create your own customized messages.
- To allow recipients to opt out of future reminders for this project:
- Click on ‘View Opt-out code’ to view codes to include in your footer message.
- By default, the code will be displayed as ‘Click here’, but you can modify this text by hovering and clicking to edit.
- Copy and paste {[optout_future_reminders]}.
- Add this code to your message.
- To allow recipients to opt out of any future invitations/reminders from this account:
- Click on ‘View Opt-out code’ to view codes to include in your footer message.
- By default, the code will be displayed as ‘Click here’, but you can modify this text by hovering and clicking to edit.
- Copy and paste {[optout_future_surveys]}.
- Add this code to your message.
- To allow recipients to opt out of future reminders for this project:
- Chain Invitation: This option offers participants the chance to invite others who might be interested in responding. When the participant enters a new email address, a new link will be sent to the recipient.
- Enable this option. The code < — Chain Invites — > will be replaced with ‘Click here’, but you can modify this text by hovering and clicking to edit.
- Chain invitations can also be added as an option on the survey’s Thank You page.
- Do Not Forward: Just to be cautious, you can use this footer note to make your recipients aware that unique invitation emails should not be forwarded.
Colors and Fonts

- You can use this section to customize your invitation, add colors to divider, border and background.
- Font settings selected from this section will be applied to the entire email invitation, overwriting any other settings applied.
Email Alignment

Select left-, center-, or right-aligned format by clicking on the appropriate icon. Note that this setting impacts the display of the message rather than text alignment.
Embed a Question
Engage participants right away by adding a question directly into your email invitation. If you’d like to embed a question, it’s highly recommended to embed the first question participants will see in your survey project. This ensures that they start off at the perfect spot and continue through in a logical order.
- While publishing, choose to edit your selected Email Template.
- Enable ‘Embed Question’.
- Select a question from the dropdown. You may embed a Radio Button, Rating Scale, Smiley Rating Scale, Like/Dislike, or NPS question.
- Drag and drop the question into the preferred location within the email invitation.
- Choose whether to keep or remove alternative participation options (button, links) to encourage participants to begin the survey from the embedded question.
- Complete the publishing process.
Questions with Data Population or Quota Management applied cannot be embedded. Additionally, while a Question Display Logic Decision question can be embedded, a QDL Show/Hide question cannot.
Email Message Body
- Customize the content of your email by sharing important details, and customize the style of your message as needed with the available editor.
- By default, invitations include a ‘Click here’ button for survey access.

- To customize participation options displayed, click on the message body and click on the blue Customize icon on the right end of the editor.
- Review and modify options as needed, then copy and paste the appropriate values into the text, including the double brackets.


Participation options cannot be customized within Test Invitations.
Mail Merge
Insert unique information about each invitee to his/her personal invitation email or subject line. Using the Mail Merge feature requires that you have certain information for each invitee (first name, job title, etc.) already gathered in a list or a file.
To add Mail Merge:
- In any section, select Mail Merge from Editor and select where you wish to place the code.
- In the Select field dropdown, select the field to use for mail merge.
- To create a custom field, include the variable name in the same brackets. For example, {{Brand name}} will be replaced by a brand name. Repeat the process to insert multiple values.
- The Mail Merge code will be placed accordingly.

Finalize and Save
- Edit the content of your email body.
Maximum image file size is 5 MB.
- Review to make sure you have the message you want, the links you need, and an appearance that looks great.
- Click on Finish and Save.
- Enter a unique template name and click Save.
